No English? No Problem!

Thursday, December 22, 2016

Junk Journals Tutorial 1 (easy) : The Rough and Dirty Journal

In my past 2 chapters, I covered the why of making Junk Journals and what materials and tools you'd need to get started. Now let's start with an easy tutorial. 

This journal is one of the easiest to get started with, especially if you have the bookbinding stapler I mentioned in Tools and Materials. (If you don't, you can substitute it with other tools. I'll explain later in the post) It will also give you a peek into simple bookbinding. I call it the Rough and Dirty Journal because here we are not so concerned about making it look nice and polished yet so it's going to look a little rough around the edges. However, it's one of the easiest to do if you want to just get started.

Tutorial 1: The Rough and Dirty Journal
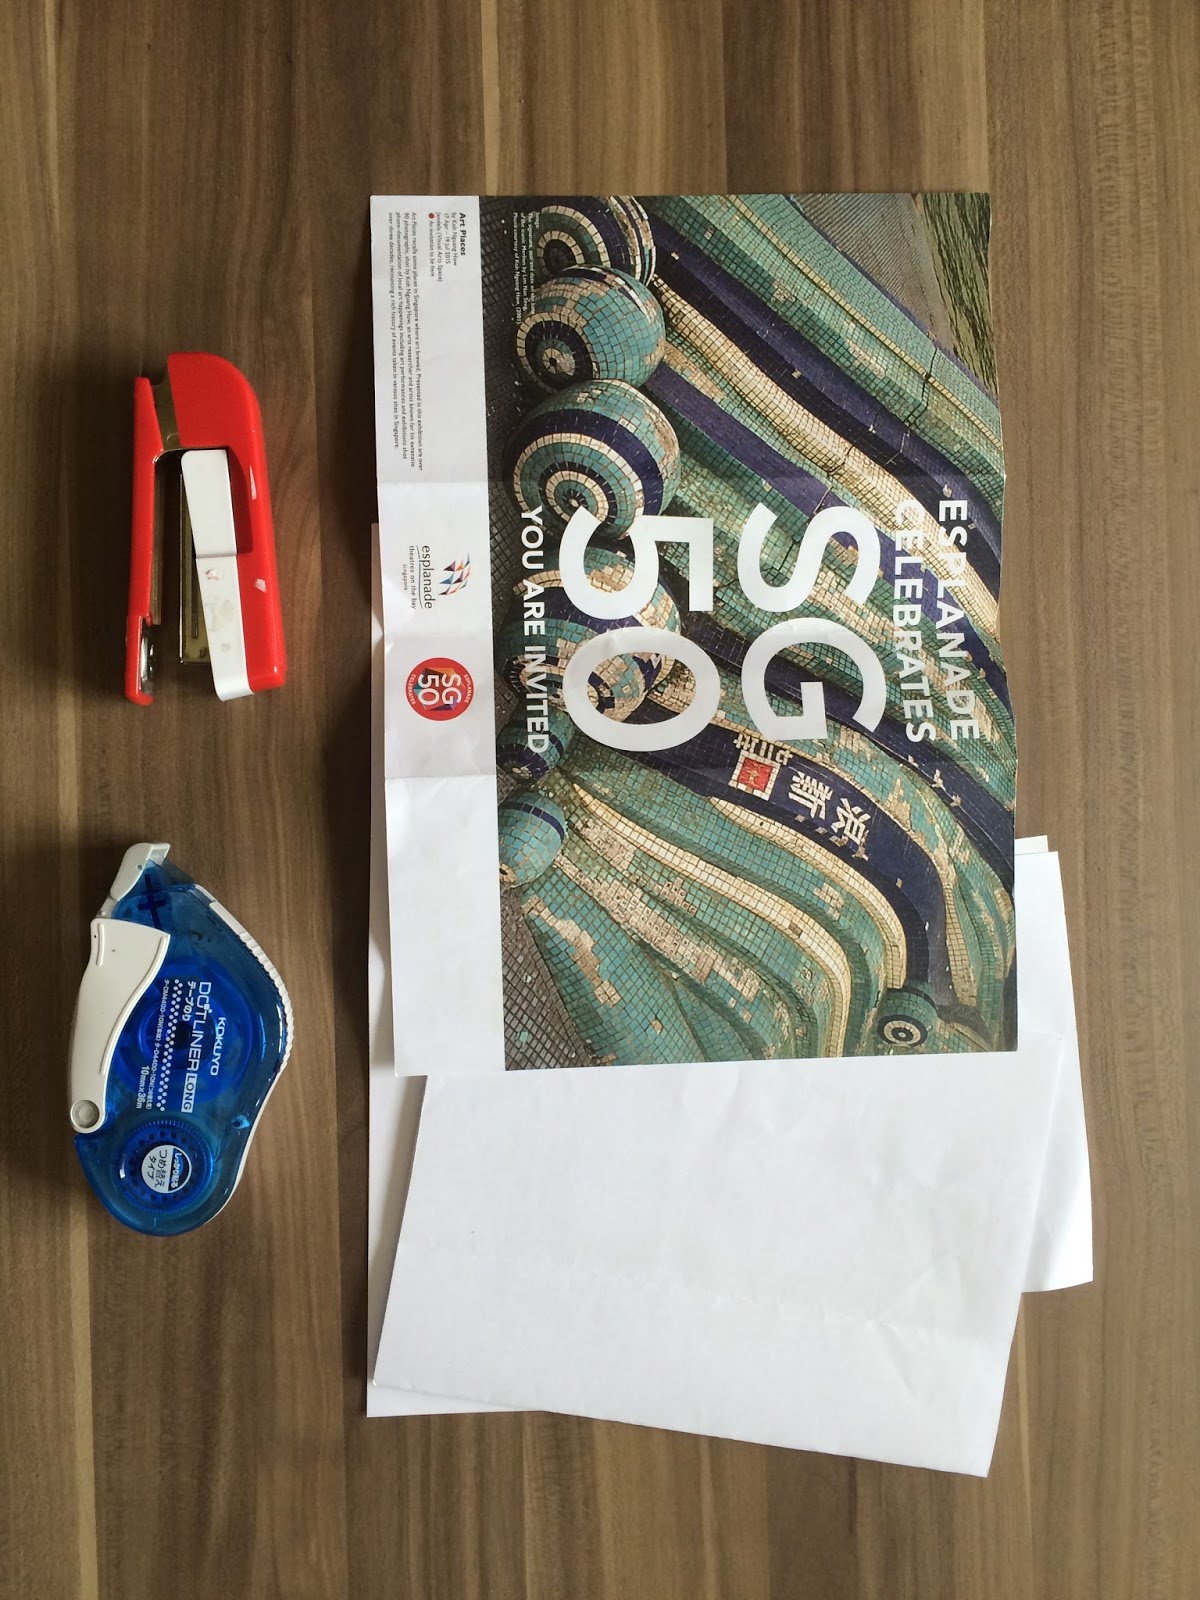
You will need:

Tools:
Bookbinding stapler 
(If not, needle and thread or tape)
Adhesive ( I like to use the adhesive tape shown in blue but you can use a glue of your choice )

Materials:
Junk paper (Ensure you have an even number of pages)
1 brochure (For the cover)


Step 1:
Arrange the junk paper together so that the written sides face each other.


Step 2: Use your adhesive to stick both sides together. You should end up with a slightly thicker sheet of paper that is blank on both sides.

Step 3: Arrange your pages together with the brochure on top. Here I have chosen an old programme sheet. Get your stapler ready.

Step 4: Fold everything in half to get a centre fold. Here, you can roughly see what your journal will look like.

Step 5: This is where the beauty of the bookbinding stapler comes in. Open the pages again and flip out the stapler. Then align it where the centre fold is before stapling.

This is a close up of the centrefold. You can see that after that is done, the pages have been stapled very nicely, like a magazine.

Repeat with one more staple on the other side and you are done! Very easy, isn't it?

This journal is still blank, but if you want to see what one looks like after I wrote in it, you can see this previous post on a Rough and Dirty journal that I already did and filled with writing.

Questions! Questions! 
So I know there will be some questions and comments on your mind, let me try to answer as many of them here.

- If you don't have the stapler I used, you can also use a needle and thread and do a basic stitch along the spine to achieve the same look. Also, you can use tape to tape the pages together. 

- If you want a more finished and polished look, you can also trim the edges of the white paper so that they don't stick out of the cover. (But hey, it is a rough and dirty journal after all...)

- For a hardier cover, use a brochure that is made of thicker cardboard or thicker paper. Alternatively, stick the brochure onto another piece of junk paper. 

More questions? Comments?
Leave them in the comment sections below and I'll get back to you as soon as I can! (Be nice, be constructive and I will do the same for you)

Did you try it out? 
I would love to see what you did with your own journals too. If you would like to share, email photos of your journal to me. Remember to include your name, country (optional) and email address so that I can credit your work here!  

Tuesday, December 20, 2016

Junk Journals, Materials and Tools - What would you need to get started?

In the last chapter, I talked about Junk Journals and why I started making them. In this one, I'm going to talk about the materials and the tools I use, and what you would need to get started.

Materials
Of course, you would need paper. Paper can be salvaged from a number of sources, those which I've tried are listed below:

Magazines. Some magazines come printed on good quality paper. After reading it, you can tear out the pages you like. For magazines which are printed on glossy paper, you may have to do some pasting with other writing paper or you may have to paint it with gesso. I'll talk about these later.

Brochures and flyers. Every week, 5 of these get put into my mailbox. I don't think the company intended for me to use them in journals. However, the glossy paper that some of them are printed on means that you may have to do some pasting or painting so that you can use them.

Statements from banks, credit cards, insurance. Word of CAUTION first: Make sure the statements are outdated before you do anything with them! These are also typically printed on good quality paper but you do want to make sure you pay off your credit card bills before you paint over them and forget about them! Also, in the case of bank and insurance statements, make sure all financial affairs are in order before putting them in the junk pile. I would usually have my husband help me to check if the statement needs to be filed before I do anything with it.

Work. Like I mentioned in the introduction, we use tons of paper at work. This is my favourite source of paper because all our work documents get printed on good quality printing paper. If only one side of the paper was used, that means the other side will be gloriously blank. Another word of CAUTION: Make sure you absolutely do NOT need the document anymore before doing anything with it! My practice is to collect the paper in a pile and only use it at the end of the year. 

Free notebooks, notepads and diaries. These may be given out by the banks or sometimes as gifts. I love them because it's easy to change their appearance by wrapping them in a design I like. By now, my friends know of my hoarding instinct so they save any free writing material they get for me. Score one for friendship!

Other advice: Collect paper in a variety of thickness. Soft paper can be used for painting and writing, stiffer and thicker paper can be used to make journal covers. Stiff cardboard can also be cut into strips to bind paper together. (More on that later)

Wow, that's a ton of paper up to use! If you already have all these lying around, what else would you need to transform them into books?

Tools

Basic tools would be:

  1. Scissors for cutting
  2. Glue to stick pages together and pictures on pages


For a more finished look, you can also use:

  1. Needle and thread for basic bookbinding
  2. A bookbinding stapler
  3. Duct tape or bookbinding tape

Now No.2 may sound a little strange but it's a great tool to have to give your journals that really professional zine look, so it's my great pride and joy! They are usually expensive and can't be found in your normal stationery store, so when I found out that Daiso (a $2 shop in Singapore) was actually selling them, I bought one right away! 

This is what my bookbinding stapler looks like: 

 The unique part about it is the white part. It holds the staples and it flips out, as shown below:
 All the way to a right angle.
 This allows you to staple paper right in the middle, and your journal will open very nicely.

This stapler is my pride and joy, considering it only cost $2 but it made my journal-making so much better! I'm tempted to buy it every time I go to Daiso just in case this red one breaks one day!

Then there are other stuff also, that make your journal a whole lot prettier. There are places where you can buy great paper or washi tape to give your journal that extra decorative touch. However, before you go there, you have to read the following:

Crafter's Anonymous - Hi, My Name is...
Personal confession: I don't only use junk paper but I also have a crazy load of craft paper, notepaper and notebooks, some of which I have had for a few years. -_-!!! When I first started scrapbooking, I went a bit crazy and bought almost every paper I thought cute. Then I hoarded them because I became afraid to use them. What if my project turned out ugly?? 

After a couple of years of this, I had the following epiphany:
What it reminds me is that I am here to DO things, not buy them. The paper I buy is meant to help me accomplish and achieve journal-making goals and I would never get anywhere near those goals if all I'm doing is accumulating paper. (Unless your goal is to set up a paper museum) Once that clicked in my head, I decided to throw caution to the wind and just use what I had.

It makes me proud to say that I haven't bought any new paper since but I've been slowly chipping away at my hoarded pile. If you feel like buying some nice paper just to spruce things up in your journal, I wouldn't stop you, but if you are going to spend the money, make sure you really like the paper and make sure you do use what you have. 

But if you really want to spend money on nice stuff...
Now you're done with the warning, here are some of the places I've been to:
(Note: These stores are all in Singapore but some also have websites for you to purchase online)

For paper and scrapbooking materials:
Kikki.k sells all kinds of wonderful stationery and sometimes it takes all my willpower to walk out of here without buying anything. 
Paperstone.sg and Typo Stationery have a great range of notebooks and to-do lists and notepads.
The Paper Market is a dream for me and a nightmare for my bank account. Everything to do with scrapbooking can be found here, like paper, washi tape and stickers.
Daiso sells a good range of craft materials, every one of which can be bought for $2, so if you are on a budget, this is the place to go. (Unfortunately, a Google search only brings up this online store which only allows you to buy in bulk. Singaporeans can find the outlet nearest to them via a quick Google search)

For inspiration and paper:
I also buy some of these magazines for inspiration and er, paper.
Flow Magazine is one for the paper-lovers and those who want life to go a bit more slowly. They sometimes include free gifts for paper-lovers (like journals) and they also release a Book for Paper Lovers every year, which is a thick tome full of beautiful paper.
Frankie Magazine is an Australian magazine full of quirky creative inspiration. They take interesting photos which I sometimes cut out to scrap and they are also printed on good quality paper.
Daphne's Diary is beautifully designed and also comes with paper goodies to cut out. 
Cloth Paper Scissors focuses on art techniques and mixed media and they also have a section on their website on art journalling and handmade books. It's a great source of inspiration.
In Singapore, all these magazines can be found at Kinokuniya or Basheer at Bras Basah Centre. I do recommend calling the stores before going down because they don't get released every month and I have made a few wasted trips before. -_-!!! 

Ok, now you know what you need to get started! Next time, I'll talk about a few easy techniques to start off with!

Monday, December 19, 2016

Junk Journals, an Introduction: What are they and Why Make Junk Journals?

I recognize that the term 'Junk Journal' is something I created so others may not know what I'm referring to. Here's an easy definition:


Junk Journal:
A journal made out of paper (or other materials) that would be considered junk and thrown into the trash.


I've written a few tutorials on making these Junk Journals, so I thought it was time to put everything together in an easy to-do guide on my blog. Now that I had the chance to make a few, it's easier to compile what I've done and hopefully it will serve as an inspiration to you out there.

I guess the first question would be:

WHY? Why make a journal out of used paper, or even why journal at all?

Why keep a journal?
There are many reasons for this, depending on the individual, so I'll start with my personal reasons. 

1) For Organization
This is the main reason for my work journal, which I use to pencil in meetings I'm supposed to attend, and my all-important to-do list. I do this so that I remember all the tasks I have to complete and the deadlines I have to follow. 


Example from my work journal, made from an old notebook.

2) For Reflection
I also use my journals to reflect on the day and what I have to be grateful for. A gratitude log comes in handy for this and it can be as easy as just writing down one day during the day that you are grateful for. 


Example from one week in my junk journal.

At this moment, some of you may think, "But you can buy gorgeous planners and journals to do all of that! Why would you spend so much time and energy to make your own??" This is answered by the following 2 reasons:

3) For the Environment
Ever notice how much paper we use? At the end of the work year, I cleared my cubicle of all my unwanted documents and I ended up with a pile of paper a couple of inches thick. This is after I already threw out some stacks of paper. Not all the documents were printed by me either. Some were handed to me by well-meaning colleagues who wanted me to know the content of the documents. Obviously by end of year they were all obsolete. 

Usually, we'd just throw the paper into the recycling bin and I had to do that for a lot, but then I realized how many documents were single-sided. That left the other side of the paper blank to do whatever we wanted.


That's how much single-sided paper I 'rescued' and it's a small fraction of the paper I had to throw.

This got me thinking about the amount of paper we use despite living in an electronic world. Even though much of our work has been delegated to the Internet, it seems we still cannot do without paper. What if I extended the life of these documents further, by using them for just one more purpose, before chucking them?

And so, the paper helped me to serve my next purpose...

4) For Creativity
It really all boils down to this. I like to be creative. I like to see possibilities where others see junk and I like making those possibilities come to light. So where others see paper that's bound for the trash, I see paper that can be written on, drawn on, folded, cut, painted to anything I wanted. I like working with my hands that way, which is why online journals haven't quite cut it for me. Plus I really like it when the outcome turns out good. 

Yes, I like this layout and I'm quite proud of it, I'm not ashamed to say.

Is it hard? Yes. Some journals were a complete flop and I had to throw them.
Is it rewarding? Also, yes! Once I got the hang of a few basic skills, I realized how easy it was to give old notebooks a new lease on life and to decorate junk paper into what I wanted.

Are there drawbacks? Well, yes too. These include:

The need to buy some art materials. 
I use a lot of washi tape and stickers which I buy from scrapbooking stores. Yes, I do recognize that there's a certain irony in having to buy more materials to recycle some materials -_-!!! though it does serve the creative side. However, if you really want to keep costs down, all you would really need is a set of coloured markers and writing pens. 

The need for time. 
If you really want something that will earn 10K likes on Instagram, I hope you have the time in your busy schedule to work on that art piece! If not, you can also do simpler layouts with just your coloured markers that will still look good. Most of the time, I take a few minutes on a weekend to do that and then once in a while, when the mood strikes me, I do something more Instragram-worthy.

The need for ideas.
Sometimes you just stare at the blank page and you have no idea what to do with the blank pages staring back at you. You can take some ideas from the Instagram accounts I follow who post dazzling planner layouts. These include:
Inspiring Instagrammers
@planwithlynne
@catsbooksandcoffee
@dedralong
@thefoxyfix
@wansplansandexplorations
@happiescrappie
@sailormimzy
@cecicat
@thedailyroe
@theresetgirl
@mydocumentedlife
@scrappinlove
@cre8tiveplannergirl

Phew! I didn't realize the list was so long! There's no way you can't have a few ideas from some of these talented planner ladies! 

Have I got you inspired? The next step is to just start and try one! I'll be talking more about the materials you would need and where you can get them from next!